An Introduction to Workflow Automation in GForge AS
Usually, in a collaborative environment, a task unit goes through a process until it’s complete. Some task types might go through some intermediate steps, and on each step a certain action needs to be taken by the assigned person. This process that a task goes through, passing through different phases/states, the people involved and the required input/output information is called a workflow.
A worklow engine, like the one implemented in GForge AS, is an automation software that lets program the procedures, steps and rules of a certain workflow. The engine will determine when the process is ready to move forward to the next step (or backwards, if defined in the worklow). When the requirements for moving to another step are met, the engine will proceed automatically, assigning resources and notifying the people involved.
How does workflow automation work in GForge AS:
The workflow engine works by defining “transitions” or “transition rules” in the specified field/fields of a tracker. It applies to fields that have a set of possible values. You can define transitions between pair of values, i.e.: the transition applies when that field changes from one value to another. Therefore, you can have as many transitions on a single field as the number of possible pair of values (values must be different, of course).
On a transition, you can define the following:
- Roles that can make the transition: you can define a set of roles that are allowed to make the transition
- Required fields: you can define which fields are required to be set
- Notify people when the transition occurs: you can add a message (text) and select a set to roles to be sent that message
- Reasign the item to the specified roles: you can select a set of roles that will have the item assigned after the transition
- Change a field value: you can select a field and specify its new value.
A real life (almost) example:
Say we have an issue (bug) tracker in a certain software project. This tracker is used for managing issues that appear on a testing phase. So, The QA people report those issues in this tracker as they appear. A junior developer validates the issue, finds possible causes, etc, then reports and passes the isue to the senior developers for fixing.
Let’s suposse we have three different modules on this software. Each module is managed by a group of junior developers. A first automation we may want to enable is to have the issue, depending on the module where it appeared, automatically assigned to the corresponding junior developers group.
When the junior developer is done validating the issue, we want it routed to the senior developer for fixing. Once the senior developer fixes it, it’s routed back to QA for retesting and validating the fix. When in QA, if it doesn’t validate, it gets routed back to the senior developer.
To summarize, the task will cycle through the different stages, being automatically routed, until QA decides it’s fixed so they can close it. Wokflow automation gets tasks assigned to people depending on specified conditions.
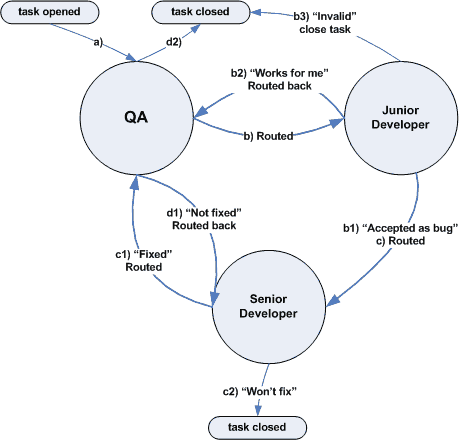
Description of the different “stages” or “phases” and “actions” of a task in the example workflow:
a) Issue is entered by a QA member, “state” is set to “Awaiting response” (default “state” setting). Depending on the “component” field setting, the issue is auto-assigned to certain user/group of the Junior Developers role
b) The junior developer tries to reproduce the issue, and sets the state to either: “Accepted as Bug”, “Works for me” or “Invalid”.
b.1) if set to “Accepted as Bug” we want the issue to be re-assigned to a Senior Developer and notify the project admin and the QA members
b.2) if set to “Works for me”, we want to reassign the issue to QA to get evaluated and closed.
b.3) if set to “Invalid”, we want the item be closed and notify QA.
c) When the Senior Developer gets an issue assigned, he/she will attempt to fix it and then set the issue “state” to “Fixed” or “Won’t fix” accordingly.
c.1) if set to “Fixed”, we want the issue reassigned to QA for retesting.
c.2) if set to “Wont-fix”, we want to notificate the project admin, but the issue doesn’t get re-assigned to other role.
d) For issues that were reassigned to QA for retesting, one of the following may happen:
d.1) Issue doesn’t validate as fixed, “state” is set to “Not Fixed” and gets automatically reassigned to “Senior Development” role for rework. Project admin gets notified.
d.2) Issue validates as fixed, tester sets “state” to “verified”. “Status” is automatically set to “closed”, and senior developer and project admin get notified.
Sample workflow diagram:

To summarize, workflow automation facilitates collaboration across departments and individuals. It streamlines the process and helps running the business more efficiently.
How to create this sample workflow in GForge:
You can use the default bug tracker that comes with GForge to create this sample workflow and see how it works.
1. Create a test project based on the standard template that comes with GForge
2. Go to “Tracker >> Bugs”
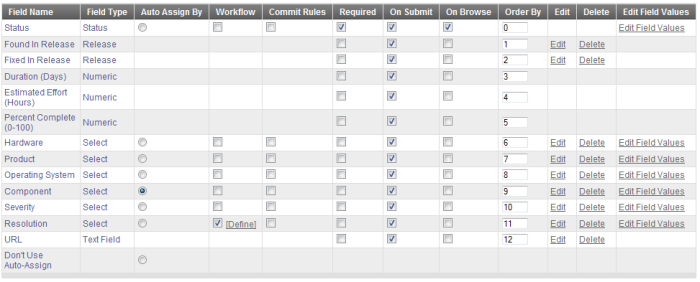
3. In the Bugs tracker go to “Admin >> Edit Fields, Auto-Assign, Workflow”
4. Select the “Component” field in “Auto assigned By” and submit.
5. Go to “Edit Field Values” in the “Component” field. Enter some values (component names) and assign user/group to each one. If you don’t have users or groups on your test project, go ahead and create/assign
them first.
6. Back on the “Edit Fields, Auto-Assign, Workflow”, check the “Resolution” field on the “Workflow” column and submit. This indicates that we want to set a workflow on this field.
7. Click on “define”, you will see the transitions matrix. Check the transitions as shown in the following screenshot and submit. Notice here that we are selecting the transitions described in the above worklow description (check the diagram).
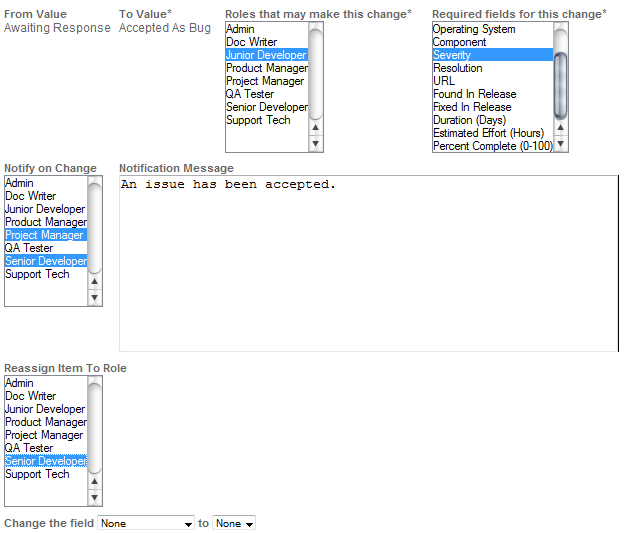
8. We will show how to define one of those transitions, you can create the rest yourself repeating this process. Click on “Details” for the “Awaiting Response” >> “Accepted as Bug” transition.
9. Here we set the transition rules and actions, set the different fields as shown in the screenshot.
10. You can repeat steps 7 to 9 to define the rest of the transitions we created. Set the “roles that may make this change” and “reassign item to role” accordinly in each case. You can see the complete list of
transitions for a certain tracker if you go to “Tracker >> Worklow rules”:
11. Your worklow is ready to use. Go ahead and create a tracker item, set it to “awaiting response”. Then login with a junior developer role, then with a senior developer, etc. Simulate the actions that each role can take while working on the item and see how the transitions occur automatically when the conditions are met.
We have given an introduction to working with workflows in GForge AS. It’s a very powerful feature that can radically improve the efficiency of the organization. We invite you to implement the example we discussed in this post and see for yourself.


